
Hidden Springs Homestead may earn a commission for purchases made after clicking links on this page. Learn More.
This easy tutorial will teach you step-by-step how to make a primitive Christmas tree on a frugal budget. I love primitive. It goes right along with our homestead and simple life, but wow, the cost of these things to purchase.
So last year, after looking and dreaming for 3-4 years, I was determined to learn how to make my own primitive Christmas tree. And I did it. Instead of paying $75 for one, I made my own for less than $20.
By the way, I should also tell you I’m not 100% sure if a Primitive Christmas Tree is the right name for this handmade Christmas tree. I’ve heard them called other things, such as a German Feather Tree or German twig trees. Also, rustic Christmas trees, a twig tree, and even seen them advertised as farmhouse Christmas trees.
So, honestly, I don’t know the “proper” name. I even think Pinterest refers to them as a Charlie Brown tree, but I know I really like them! And by making my own, I saved a ton of money.
You’ll love this tutorial if you love old-fashioned Christmas and handmade Christmas tree ornaments!
Handmade gifts are so much better to give. Whether it is some handmade ornaments, miniature stockings to hang, or maybe even a cute Christmas garland made with the kids, you can decorate your home on a frugal budget for the holidays.
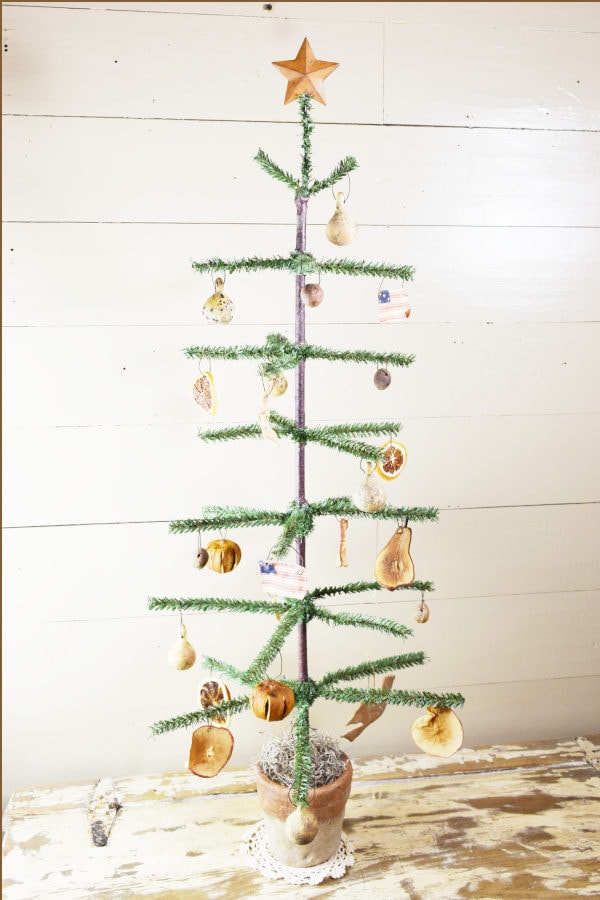
How To Make a Primitive Christmas Tree
I know by looking at it, it may look a bit complicated, but I assure you, it is easy to make.
Of course, it will take some time, but by planning ahead, you can have your own special and unique DIY rustic handmade Christmas Tree for this year’s holiday season.
Supplies
- 1- 1/8 inch dowel rod
- Dark Stain
- A container of choice (needs to be solid without holes)
- Plaster of Paris for crafts
- 15 pcs Craft Canadian Pine Stems (12 inches)
- Floral Wire
- Brown Floral Tape
- Glue Sticks
- Spanish Moss
- Rusty Decorative Craft Wire (for ornaments)
Tools
- Hot Glue Gun
- Tape Measure
- Razor Knife
- Wire Cutters
- Drill
- 1/16″ drill bit (tiny)
Instructions
First, based on the height of your chosen container, decide how tall you want your tree to be. Be sure to take into consideration the depth of your container. The dowel sits on the bottom of it. Mine is 30 inches.
Step One: Decide the Height of the Tree
Measure and cut the 1/8″ dowel to length. Since it is so small in diameter, you can score all around it with a razor knife and then gently “bend” it, and it will break where it is scored.
Step Two: Stain Tree Trunk (Dowel)
Next, stain the dowel using an old cloth and lay it aside to dry. This step helps in case you miss any when wrapping with floral tape.

Step Three: Mixing Dry Plaster
Following the instructions on the Plaster of Paris box, mix enough plaster to fill your container. The amount will depend on the size of your container.
I don’t actually measure. I use a plastic cup, scoop out dry powder, and fill my container to about half-full. Then add water and stir well, making sure to get the dry powder off the bottom.
Once it is mixed well, I add more dry plaster mix and more water as needed. I do this until my chosen vessel is as full as I need. You’ll want your plaster to be on the “thick” side, not watering and thin.
TIP: When working with dry plaster Paris, work outdoors or cover your surface. Plaster, when mixed with water, “sets up” quickly and will ruin a tabletop. Also, whatever you stir the mixture with should be disposable. I use popsicle sticks or a piece of dowel that can be thrown out.

Step Four: Positioning Dowel
Once your container is filled with wet plaster, before it sets, insert your dowel into the bottom center. To ensure it stands upright and straight, use something to hold it in place so it stays put. (See image below) I “eye-balled” mine. If you prefer it to be perfectly straight, you can use a small level like this one.

Since it is an old-fashioned craft, I love the idea of eyeballing it. It is simple, unique, and doesn’t have to be perfect.
Let it dry overnight. Make sure the dowel is held in place while the plaster sets up.
Step Five: Adding Tree Limbs
Now, the fun part – adding the limbs. When making the limb layers, I think it’s best to work with “odd numbers.” In other words, since my tree is 30 inches tall, I wanted at least 5 -7 levels of limbs.
TIP: You should begin at the bottom and work your way to the top. Each layer will vary a bit as you go.
First, decide where you would like your bottom layer to be. Again, I “eye-balled” mine.
You, of course, can be more particular and measure if you like. Mine is about 4 inches above the pot.
To make the pine feather limbs, hold a 12-inch pine craft stem in place against the dowel and decide by looking at it how long you want it to be. This is strictly preference based on the width of your pot. Or, as I’ve already mentioned, you can measure as well. Your choice.
My first layer for this tree is 7 inches. BUT DON’T CUT STEM TO SIZE! Wrap it around the dowel a couple of times so that it stays in place.

Why You Don’t Cut Limbs at this Point
Don’t cut “yet,” so when you add the second layer, you can decide the length it is by looking at 2 layers instead of the one. Your primitive tree will look different as you add more layers of pine stems. So don’t cut until you are sure of the lengths you want. You may even decide to put on 3 layers before you do any cutting.
Once you are sure how long you want the layers to be, carefully, using wire cutters, cut to length plus (+) 2 inches. In other words, my bottom layer is 7 inches wide, but I cut my stems to 9 inches.
This gives you the length you need, plus enough to wrap around the dowel to hold them in place.
The bottom 3 layers will have 5 stems total on the dowel. The other layers higher up will need only 4 stems each. And then the top will use only 3.
So here are my layer sizes:
- 1) 5 stems; 7 inches
- 2) 5 stems; 6 1/2 inches
- 3) 5 stems; 5 1/2 inches
- 4) 4 stems; 5 inches
- 5) 4 stems; 4 inches
- 6) 4 stems; 4 inches
- TOP: 2 are 2 1/2 inches, and the center is 4 inches
As I’ve already said, you can choose to make yours a totally different size altogether. I wanted mine small enough to fit nicely on a tabletop. So I chose 30 inches, about the height of a lamp.
I have now made 5 of these. They have varied sizes, from 20 inches to my tallest 36 inches. The size will really depend on what you use as the container.
Make your tree tall enough not to be overpowered by it, but don’t let it be so tall that it doesn’t “balance” with the size of the container. Make it all balance to your liking.
Step Six: Permanent Limb Attachment
Wrap all the pine stem layers around the dowel, step back, and take a look. If you like how it looks, the next step is to use the floral wire and wrap it around the stems to hold them securely in place.
Cut a piece about 12 inches long, squeeze the stems together, and wrap the wire around them in all directions to hold them in place on the dowel until all layers are done.
Next, use your hot glue gun and glue each of the layers in place to the dowel. Make sure to get enough glue to cover the wire stems and adhere to your dowel.

Step Seven: Attach the top Limb
Next is adding the top layer. Using your drill, carefully create 3 holes in the tip end of the 1/8″ dowel.
This might be a bit tedious, but you only need to go deep enough to give the cut stems a place to sit down into the dowel so they can be held in place with hot glue.

Once these are drilled, using the glue gun, glue 1 short stem into each hole, putting the longest of the 3 in the center. Hold stems in place until the glue dries. Use quite a bit of it to hold them in place.

Step Eight: Adding Bark
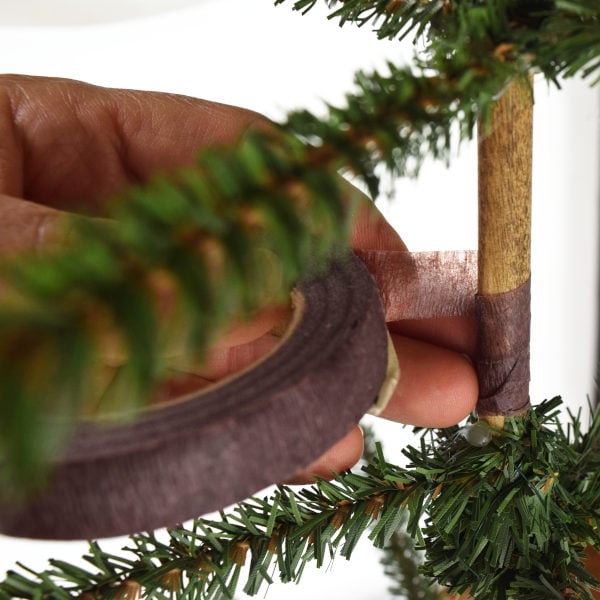
Now, this just might be the most difficult part. Using the brown floral tape, start at the bottom and wrap the dowel 2-3 times tight, around the down between each stem layer.
I say it is difficult because it should be tight, and I find getting it started on the dowel difficult. You may not have any trouble at all.
There is no need to wrap the stems. Just carefully wrap the floral tape as close to them as you can. This is why you stained the dowel dark, just in case there is some space on the dowel that is not covered.
Wrap all the way up to the top and wrap around to cover the glue that is holding the top 3 stems in place. This will look like bark added to the tree trunk.
Step Nine: Adding Grass
Lastly, glue Spanish moss in the container to cover the white Plaster of Paris. Your tree is done!! It’s time to decorate your gorgeous primitive Christmas tree.

Rustic Tree Topper
Deciding on your decorative tree topper may be a challenge. It was for me. If you are trying to stay with old-fashioned rustic Christmas ornaments, you may prefer to make something.
My house is decorated in a primitive style with dried flowers, gourds, and natural items, and I wanted it to go along with the theme.
I did some online searching but found nothing that spoke to me.
So, after much searching for something natural, I decided on a rusty star since my favorite color is rust. Perfect!
My star came from Hobby Lobby in a pack of 6.
Easy Handmade Christmas Ornament Ideas
Of course, you can decorate your rustic tree in any fashion you like. Since I like old-fashioned, primitive, and simple, I chose to decorate mine with tiny handmade ornaments, salt dough ornaments, dehydrated fruits & dried nuts.
I like a bit of an Americana Theme, so I also made handmade rustic flags to go on my tree.
So depending on what you choose to use will determine exactly what materials you will need. Here’s what I used:
- Dried Orange Slices (I used my dehydrator for the dried fruits)
- Dehydrate Apple Slices
- Dried Pear Slices
- Whole Dried Oranges (I used Cuties)
- Nuts in their shells: (need to have hard shells) – I used dried Crab Apples and Hickory Nuts (from my yard)
- Dried Tennessee Spinner Gourds

If you don’t enjoy making small ornaments, these little ornaments look old-fashioned too.
So there you have it. This old-fashioned handmade Christmas tree will fit right in with your rustic or farmhouse Christmas decor. This year, make every room look as festive as possible when you make this primitive Christmas Tree.
More Fun Holiday Crafts:
- How to Make A Natural Twig Wreath
- Handmade Christmas Stocking Ornaments
- 45 Handmade Christmas Ornaments
- Handmade Rustic Candy Cane Ornaments
- 39 Homemade Gift Ideas in 15 Minutes or Less
- Snowman Clothespin Ornaments
- Fun & Simple Christmas Tree Garland (Kids Craft)
- DIY Rustic Fabric Garland
Easy To Make Primitive Tree

You'll love creating this simple and unique handmade Primitive Christmas Tree for your holiday season or for any time to the year.
Materials
- Dark Stain
- A container of choice (no holes)
- Plaster of Paris for crafts
- 15 pcs Canadian Pine Stems (12 inches)
- Green Floral Wire
- Brown Floral Tape
- Glue Sticks
- Spanish Moss
- Rusty Decorative Craft Wire
Tools
- Hot Glue Gun
- Tape Measure
- Razor Knife
- Drill
- 1/16" drill bit (tiny)
- Wire Cutters
Instructions
Prepping Container:
- Decide height of your tree. Be sure to take into consideration the depth of your container.
- Using a razor knife, measure and cut dowel to desired length.
- Stain dowel with a dark stain, set aside to let dry.
- Mix plaster of paris in container by following instructions on the box.
- Insert dowel down to the bottom in the center of container. Prop to hold it in place and cure overnight.
Adding Pine Limbs:
- Starting at the bottom, decide how high from the container you would like the first layer.
- Hold stems in place against the dowel and decide how long you would like them to be.
- TIP: Before cutting any pine stems, wrap 2 layers to see how long you would like for them to be. Tree will change in appearance as you add more limbs.
- Once all pine stems and you like the way it looks, use floral wire and wrap it around the stems to hold them securely in place.
- Use hot glue gun to glue each layer in place to the dowel. Hold until glue dries.
- Use the drill, carefully drill 3 holes in the tip of the dowel.
- Using the glue gun, glue 1 short stem into each hole, putting the longest of the 3 in the middle. Hold these in place until the hot glue dries.
- Use brown floral tape, start at the bottom and wrap the dowel 2-3 times all the way up between pine stem layers.
- Glue Spanish moss in the container to cover the dried plaster. Your tree is done!
- Decorate your primitive tree as desired.
Notes
This tree can be use year around and decorated for different holidays such as Christmas, July 4th and Easter. You'll save a ton of money by making your own.
Connect with Hidden Springs Homestead!
Be sure to follow me on social media so you never miss a post!

Dianne Hadorn is the owner of Hidden Springs Homestead, nestled in the hills of East Tennessee. A Master Gardener and lifelong homesteader, she teaches families how to grow real food, preserve it with confidence, and depend less on the grocery store. Through her practical, down-to-earth approach, Dianne has become a trusted source for beginners who want to build a sustainable lifestyle and fill their pantries with food they’ve grown themselves.
How are you wrapping the stems around the dowel? Are you wrapping just the 2″ of one end of the stem around the dowel? I would like to have seen a picture of the wrapping process. Also, how much space is best between the branches?
Hi Linda,
The wrapping instructions and image is found under Step #8. It shows how I hold the brown tape and wrap it snug around the down pulling on it just a bit so it stays tight. I wrap until the dowel is covered. As for the space between the branches – this is your choice. I’ve got several of different sizes with different spaces. The idea is to keep it simple and to you liking.
Thanks for reading, I hope this has answered your questions. Let me know is I can help more.
Dianne
I hope to try to make this primitive tree! thanks for the instructions! Diane
You are welcome! If you have any questions I’m an email away or grab me here.
Thank you for the easy instructions, I can’t wait to get started!
Hi Linda,
I’d love to see it when you are done. Feel free to share by email or to the FB page. It will be gorgeous. Mine is out year around.
I adore your tree. All the other tree patterns instructions are long and time consuming. Your tree could also be called Farm Style. Thank you this is what I have been looking for simple and pretty.