
Hidden Springs Homestead may earn a commission for purchases made after clicking links on this page. Learn More.
Growing basil is one of the easiest herbs to grow. Not to mention its tasty flavor. In this post, I’ll teach you how to grow basil from seeds at home any time of year.
Basil is one of my favorite herbs, and I tend to grow several varieties each year. It’s great for using in recipes or making pesto. Basil is also a key ingredient in my homemade spaghetti recipe and pizza sauce recipe. It’s a great healthy treat for chickens too. So we use a lot of it.
In this guide to growing basil, I’ll do my best to cover everything you need to know to grow basil from seeds in your home.
Growing Basil From Seeds
Basil is a member of the mint family. And if you’ve ever experienced growing mint, you will realize how easy it is to grow. So choosing what variety to grow can be a bit challenging.
Different Varieties of Basil Seeds
- Cinnamon Basil
- Sweet Genovese Basil
- Thai Basil
- Lemon Basil
- Purple Ruffle Basil
- American Basil
- Holy Basil
- French Basil
- Red Basil
- African Blue Basil
- Dark Opal Basil
The names are colorful, like a rainbow. This is not a complete list; it’s only some of the more common varieties. Each variety has its own unique flavor. I would recommend you grow several to decide what your favorite is.
RELATED: Even if you’ve never gardened before, this Vegetable Gardening for Beginners Ultimate Guide is for you! Learn everything you need to know from over 60 resources, all in one place, to be a successful gardener, including improving soil, cover crops, warm and cool season crops, organic amendments, fertilizing, watering, and so much more.
Planting Basil Seeds
Basil is a fast-growing herb that can be direct sown in healthy soil. But many, including myself, prefer to start seeds indoors. This gets a jump-start on the spring gardening season.
The best part is once you learn how to start seeds indoors, you can pretty much start almost anything inside. Basil is no exception either; it can be grown indoors in pots or containers all year round.
Basil seeds do not need light to germinate. They only need to be in a rich, healthy seed starting mix and kept warm with heat mats. I use this ProMix Mycorrhizae seed starter mix and can’t say enough good things about it. I will say it is more costly than other seed starter mixes but so worth the difference. Seeds thrive in this stuff.
When to Plant Basil Seeds
People who live in warm climates can start basil seeds outside or direct sow the seeds in the garden. Soil temperatures will need to be 75°F – 85°F for seeds to germinate.
Here in Tennessee, our soils warm up to this temperature around the end of May to early June. So, this could be a good experiment to try. Basil is an annual, so it does grow to full size in a few weeks.
But if you live in a colder area, you will benefit from starting them inside. You should start basil seeds 4-6 weeks before your last frost. Or, as I said, direct sow once the soil temperatures have reached at least 70°F.
If you plan to direct sow, make sure your last frost date has expired by at least 2 weeks. Basil is not cold hardy, and will not tolerate frost or temperatures below 55°F.
How to Plant Basil Seeds
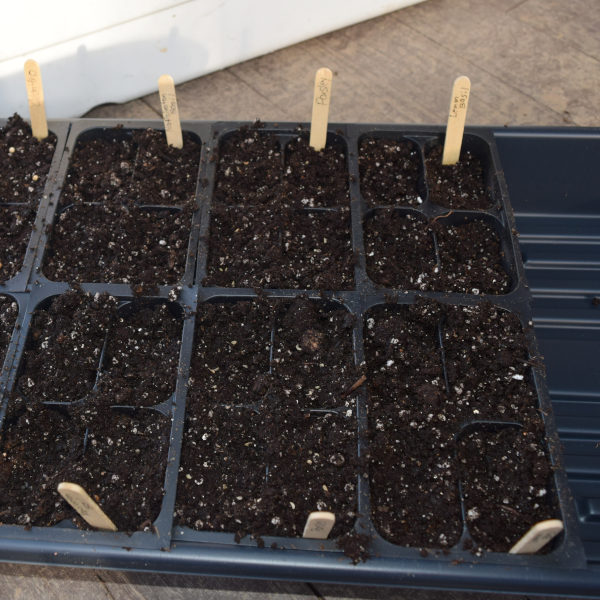
There’s not anything special you need to plant basil seeds inside. They will enjoy soaking in water overnight. This softens their hard shell and speeds germination. But this is optional.
You can find a complete list of seed-starting supplies in this step-by-step guide, along with all the tips and tricks you’ll ever need for starting any variety of seeds indoors.
Basil seeds are tiny, and you should only plant them ¼-inch deep. Quick tip: Fill seed cell with starting mix, sprinkle in 3-5 seeds, then cover with ¼-inch starting mix. Press to ensure seeds have good contact with the soil.
RELATED: Take the guesswork out! Use the easy formula worksheets in The Canning Garden Workbook (printable) to figure out how much to plant, for canning, to feed your family for a full year!
Germination Time for Basil Seeds
Basil seeds, if kept warm and moist in the right conditions, germinate quickly. On average of 5-11 days.
But it can take longer if conditions are not right. If soil is too cold, they will germinate slower, and to speed this up, I’d recommend adding a seed starting heat mat. I use several of these ones.
Caring For and Maintenance Of Basil Seedlings
Once basil seeds first germinate, they first sprout “seed leaves” called Cotyledons. But as they continue to grow, they will develop their “true leaves.” These are the ones you eat.
The image below is a perfect example of a cotyledon. This is an image from a post about how to grow tomatoes. But you can see the specific difference between the 2 leaves.

Now that they have germinated, now what? It’s not difficult; they need only some common things to help them grow strong and healthy.
Once seedlings are 3-4 inches tall, carefully thin them out and keep the strongest one. In other words, remove the weakest plants.
Do this using a set of sharp pointed scissors or garden snips; I use these. These work great for thinning herb seedlings and harvesting herbs too. Never pull seedlings. This destroys roots, and seedlings can die.
LIGHT
Basil seedlings or any seedlings need a lot of light to prevent them from becoming “leggy.” This means the right conditions have not been met, and seedlings grow and stretch for the light. They become weak and pale and have long skinny stems with small leaves.
Grow lights, like these full spectrum lights, should be kept no more than 1-2 inches above seedlings. And should be on for 14-16 hours a day. You can use a simple timer, like this one, to turn lights on and off. As seedlings grow, lights should be adjusted and kept 1-2 inches above them.

WATERING
Basil seedlings should be kept consistently moist but not wet. Never water from the top; this can cause white mold and bacteria to grow on the soil, weakening the seedlings.
Water from the bottom and allow the soil to wick it up. Remove any water that has not been wicked after 20 minutes to prevent mold issues.
TIP: To know if your seedlings need water, use this easy-to-use soil meter. It not only measures moisture, but it also measures pH balance in the soil as well as light. I use mine often as a helpful guide.
FERTILIZING
Once true leaves grow, it’s time to start fertilizing. My favorite organic fertilizer is a weak mix of fish emulsion. It stinks really bad but works great! OR you can also make an organic compost tea.
Fertilizers should be added every 2 weeks while they are inside.
REPOTTING
As I mentioned earlier, basil grows relatively fast. If you started seeds in small seed cells, they would need to be potted up. I use these 3-inch pots for potting up seedlings.
You may prefer to use plantable pots that can be planted into the garden soil. I’ve never used these, but I do have homesteading friends that use them.

It’s really a choice. I like the idea of being able to reuse plastic pots so I can save money on my budget each year by not replacing them.
WHEN TO HARDEN OFF
Before transplanting basil outside, it needs to adjust to outdoor temperatures. This is called hardening off. This is why it’s important:
Seedlings are spoiled. They have been in a consistently healthy environment with heat, watering, and light. Now it’s time to transplant them outside; they need time to adjust to continue to be strong and healthy.
About 2 weeks before they should be planted outside, begin exposing them to the outdoors for 3-5 hours a day. Begin in a shady area and gradually increase exposure to sunlight and increase their time outside.
They will be ready to transplant outside once they have been in the full sun for a full day.
TRANSPLANTING OUTSIDE
Now is when things get exciting! If you have a backyard garden, basil is a great companion with other vegetables. But, if you live in an urban area, basil will also do well planted in flower beds as an edible landscape. Or it will even grow well in containers or pots too on a balcony.
No matter where you are planting it, it is all done the same.
Before transplanting basil seedlings in the garden, amend poor soil structure with organic fertilizers, such as compost, fish emulsion, worm castings, and homemade calcium powder.
Next, dig a small hole the same depth as the plant is in its growing pot. Carefully tilt the seedling on its side, squeeze the pot, and the seedling will slide out. If you are using plantable pots, these can be set right into the soil and covered.
Tease roots on the bottom by separating them a bit with your fingers. This encourages roots to spread out in the soil faster. Place the basil plant in the hole and fill it with compost and soil, and water it well.
SPACING:
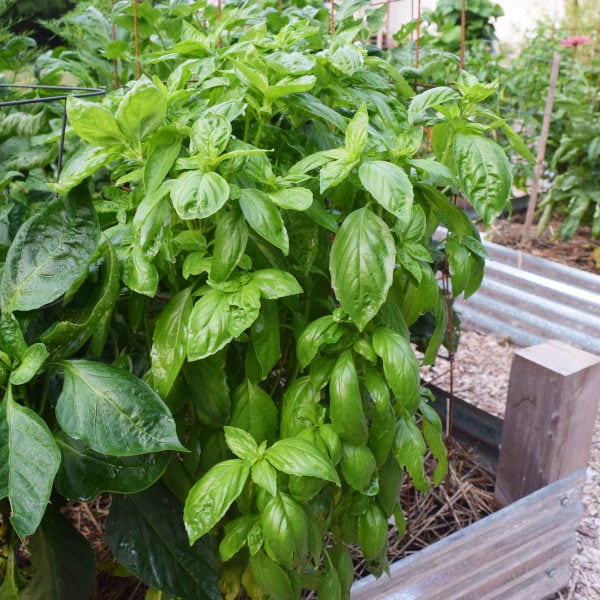
Basil does not need a lot of space. It grows to be about 20 inches tall; ideally, you should space plants 8-10 inches apart. They need only enough room to have adequate airflow to prevent disease.
How Long Until Harvest
As mentioned earlier, basil is an annual, which means it will grow pretty fast. The number of days to maturity is 65-75 days after seeds are sown.
The best part about growing basil is that we don’t have to wait until the plant is fully grown. Since it’s the leaves we use, you can start harvesting at any time once it has true leaves.
I recommend waiting until it’s established, has several leaves, and is at least 8-10 inches tall. This will give it the best opportunity to grow to be strong and healthy.
At full maturity, basil plants will grow to about 20 inches high. Some varieties will grow taller. The seed packet will provide you with this information based on the specific variety.
When and How to Harvest Basil
Harvesting basil is simple. You need no special tools or equipment. A nice pair of kitchen scissors will work, or as I mentioned, I use these garden snips. The precise, sharp point lets you see exactly where you are cutting – I like that.
Basil is what is called a cut-and-come-again annual. Meaning when it is cut, it will grow back and continue to grow all season long. The more you harvest it, the more it’s going to grow. It will continue to get bushier and loves harvesting.
The best time to harvest basil is early in the morning, right after the dew has dried. This allows for the oils to be juiciest and have their best flavor.
To harvest, gently clip leaf stems about ¼-inch above the node. The node is where you will see tiny little leaves sprouting out from the stem. You also will want to harvest from the top down.
For a small harvest, you can take only a few leaves at a time. Or, for making pesto or preserving basil, you can take larger amounts by cutting back 1/3 of the plant at a time. This will help to encourage growth and not cause the plant to die.
Once temperatures are consistently above 80°F, basil will try to bolt. Bolting is when a stalk grows up from the top and tries to flower and set seeds. To keep basil from bolting, pinch this flower stalk off.
If basil bolts and sets seed, the flavor becomes bitter and not as tasty. But if it’s an heirloom seed, harvest the seeds and save them for planting next season.
How to Use Fresh Basil
Use basil in cooking and canning recipes like spaghetti sauce and pizza sauce. Preserve it by freezing in oil or butter or drying it these 4 easy ways. So now you have several choices for stocking your pantry and being able to enjoy fresh basil all winter season.
So there you have it. It’s easy to learn how to grow basil from seeds. It just takes a bit of practice, but once you get the hang of it, you’ll be growing several varieties. And you’ll find your favorite variety.
Related: Learn more about freezing with my Quick Start Guide to freezing Food at Home
I’ve tried to think of everything you need to know about how to grow basil from seeds and to help guide you through any issues.
More Gardening Posts:

Connect with Hidden Springs Homestead!
Be sure to follow me on social media so you never miss a post!

Dianne Hadorn is the owner of Hidden Springs Homestead, nestled in the hills of East Tennessee. A Master Gardener and lifelong homesteader, she teaches families how to grow real food, preserve it with confidence, and depend less on the grocery store. Through her practical, down-to-earth approach, Dianne has become a trusted source for beginners who want to build a sustainable lifestyle and fill their pantries with food they’ve grown themselves.