
Hidden Springs Homestead may earn a commission for purchases made after clicking links on this page. Learn More.
Did you know you could be drying basil leaves at home? It is simple and easy to do and by drying your own fresh basil leaves you will enjoy saving money on the food budget too!
Basil is a delicious herb, with a pungent flavor, that home cooks love. And whether you grow your own or purchase store bought fresh basil, drying it will allow you to enjoy the flavor all fall and winter long. Just store it in the pantry.
This guide will go into detail of how to dry basil using each of these methods as well as give you some storage tips for keeping dried basil fresh.
Why Dry Basil?
Let’s face it, basil is an herb that is so versatile in the kitchen. It has many uses in different dishes and it’s a great herb for canning things like homemade pizza sauce and spaghetti sauce.
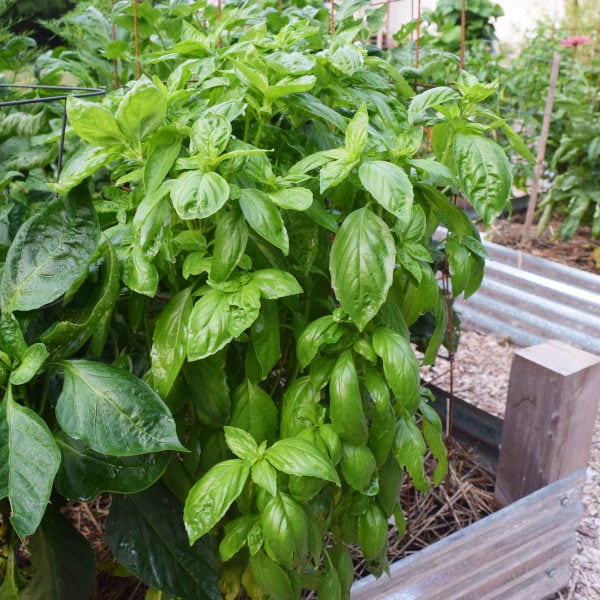
And since basil is one of the easiest herbs to grow, you can easily grow basil from seeds in the home garden or even in containers. And then dry a lot more for much less than the cost of store bought brands.
You can then fill your pantry with fresh dried basil and have it to use all winter when fresh basil is not available. So drying your own basil saves you money and even tastes much better than the alternative.
Dried basil does tend to lose its delicious flavor after only a few months on the shelf. So another benefit to drying your own is you can choose the best method that works for you, and be able to retain that delicious flavor since you know it’s not been sitting on a shelf, in a warehouse, for months.
Do You Wash Basil Before Drying?
Yes! Simply fill a sink with cool water and gently swish stems around to clean them. Lay them out, single layer, on a towel or hang to dry.
The time to dry should be about an hour or to speed drying you can carefully blot dry using a soft towel to remove as much moisture as possible.
Or, I use a salad spinner, like this one. The pull string spins it fast and it gently , but quickly removes the water in seconds.
Basil leaves bruise easily, so be careful when handling them.

Either way you do it, it’s important to remove the moisture, otherwise you run the risk of mold or brown spots forming on the leaves and these should be tossed into the compost.
So make your basil leaves are dry before drying them! Literally.
4 Easy Ways of Drying Basil
How to Air Dry Basil
Air drying is done totally natural. No electricity is required as it is with the other methods. By air drying, you retain all the natural oils for flavor since it is not being dried with heat.
Preparation
To prepare basil for air drying you need only a few items:
- Scissors or Garden Clippers (I use these)
- String, Twine or Rubber Bands (I prefer rubber bands)
- Lunch Size Paper Bags (optional)
- Clothespins
- Plastic Hanger
Tie, Attach and Hang
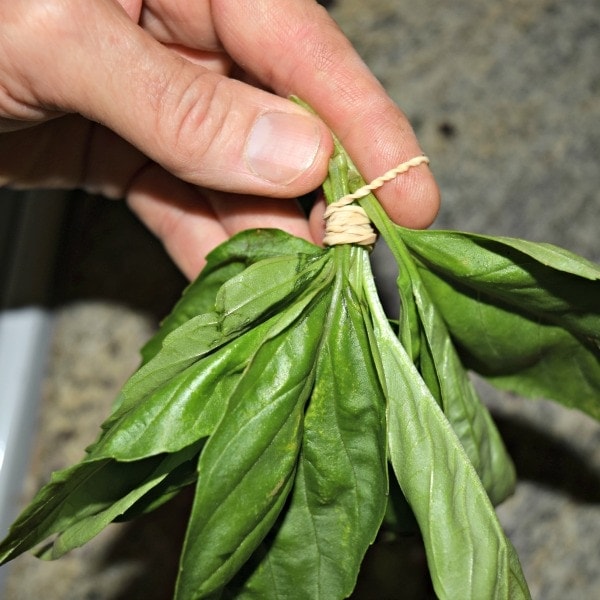
Step 1. With clippers, snip leaves from steams and lay them on a surface in a pile.
Step 2. Next tie with a twine or use a rubber band to bunch leaves together tightly.
Many use string or twine to tie the stems, I prefer a rubber band. The stems will shrink as they dry out and become smaller. A rubber band will continue to keep them tight and hold them together, whereas a twine or string will allow them to fall onto the floor.
Step 3. With scissors, cut off the bottom of the paper bag and write the date on it. (This is so you don’t have to remember when you hung them).
Step 4. Place the bag over the basil and gather it around the stems tightly. The purpose of the bag is two-fold:
- When drying basil, it needs to be kept in an area out of direct sunlight, but with good airflow. The bag will help with this – if exposed to too much light, basil will turn black or a dark brown and not be usable.
- The bag also helps to keep dust off while it is hanging to dry for several weeks. It will stays dust free and clean.
STEP 5. Next, lift a couple wraps of the rubber band and place them over the “squeeze” end of a clothespin. If using string, clothespins are not necessary. The rubber band will hold basil tight on the clothespin so that it doesn’t fall to the floor.

Have you noticed I keep mentioning the floor? I’m speaking from experience unfortunately. It’s super frustrating to find your air-drying basil is no longer hanging. It’s all over the floor, rubber bands will prevent this from happening.
Step 6. Squeezing clothespin to open it and attach it to a hanger. I prefer to use plastic hangers, they are fatter than metal hangers. Therefore, the clothespin don’t move while attached to it. (The bag needs to hang downward to keep it dust free while it’s drying).

Hang bunches in a warm, dry area out of sunlight, a closet works well. They will need good air circulation to speed drying time.
The time for basil to air dry will vary depending on the humidity, air circulation and light. Average time in well controlled environment is 3-4 weeks.
FAQ’s: “How many bags work well on one hanger? Based on the picture, it looks like you could fit 4 or 5, but I worry about over crowding”.
ANSWER: A hanger can comfortably hold at least 4. Just don’t “press” the bags together to make room. You are right, allow the basil adequate room for air circulation.
When It’s Ready
You’ll know your basil is completely dried out and ready to store when it’s easily crumbles into small pieces. If it does not crumble easily, it should be allowed to dry longer.
Drying Basil in the Oven
Oven drying basil is much faster than air drying, but it has a couple of drawbacks:
1) It requires much closer attention and does need to be tended carefully. 2) It uses electricity and heats up the house since you harvest basil in the summer.
Preparation
For this method you will need
- An oven
- Flat baking sheets
- Parchment paper for lining baking sheets
Wash and dry basil as before to remove dirt and such from the garden.
Oven Drying Basil
You have two options for drying basil in the oven:
Step 1. Preheat oven to 200°F or less (Your oven’s lowest setting, but not over 200°F).
Step 2. Line flat baking sheets with parchment paper.
Step 3. Once basil leaves are completely dry, remove the leaves from the stems, tear them into smaller pieces and lay them out, flat- single layer, on the parchment paper lined baking sheets.
Step 4. Place in the oven and bake, slowly until leaves are crispy and easily crumble when touched. The amount of time will vary depending how large and thick your basil leaves are.
When I used the oven, it took almost 5 hours.
The second option is to heat your oven to 200°F for 20 minutes to an hour and then turn it off and leave basil overnight. The hot oven will continue to dry basil leaves and it doesn’t need to be watched as closely.
When Basil is Ready
As with air-drying, basil is completely dried and ready when it easily crumbles.
How to Dry Basil in a Food Dehydrator
Depending on what food dehydrator you own, if it has an adjustable thermostat, follow the temperature guide in your owner’s manual. I use this food dehydrator and set the thermostat to 115°F for drying herbs.
Food dehydrators are designed to heat to much lower temperatures than an oven, and with lower temperatures, you retain more of the natural herb flavor. But they do take make longer to dry basil.
Preparation
Wash and blot dry basil to remove as much moisture as possible. Preheat food dehydrator to correct temperature according to manual.
Dehydrating Basil Leaves
Step 1. Spread basil leaves on trays in a single layer making sure not to overlap.

Step 2. Dry 12-14 hours, time will vary, depending on your food dehydrator.
Step 3. Check for easy crumbling, if it doesn’t crumble, increase temperature to the next higher temperature setting. Continue to dehydrate, checking at random.
When Dehydrated Basil is Ready
Basil is ready to store when it is super crispy and easily crumbles.
How To Dry Basil in the Microwave
This is probably my least favorite way to dry basil. This is a bit tricky and the most dangerous to me. I found that even though it takes only seconds to dry, it cannot be rushed. You can only do small batches but it is very quick and easy to do.
Preparation
Wash and dry basil to remove as much moisture as possible.
All you need is, of course, is a microwave and some paper towels.
Microwave Drying Fresh Basil
Step 1. Before single layering basil leaves on a paper towel, remove the small stem from the very bottom of the leaves. (See the image below).

Step 2. Lay basil leaves, out flat – single layer on a dry paper towel. Place another paper towel over the top to collect moisture on the top side.
TIP:
- Don’t use a cloth towel or fabric. These are too thick and will hold in moisture making it impossible to get the basil dry.
- Be sure to remove the stem on the bottom (see image). It is a tiny piece wood when it is dried out. The microwave will cause it to catch fire! (I had this happen to me more than once before I figured it out)
Step 3. If your microwave has variable settings, using the highest setting dry cycle for about 15 seconds at a time. Check leaves carefully at the end of each cycle. Allow to cool for about 30 seconds before you test them for crispness.
The number of times you need to run a cycle will vary, depending on your microwave as well as the basil leaves themselves.
TIP: Once your paper towel or napkin has gone through 3 – 4 cycles, change it out with a new one. This will help to keep it from catching fire as well.
When Microwave Dried Basil is Ready
As with others, basil is ready when it is crumbles to the touch. Basil leaves will need to cool completely before storing.
We’ve talked about 4 ways of drying fresh basil and now do you now understand why I prefer to air dry when drying fresh basil? It can be hanged in a room, and forgotten, not loose its flavor and be completely safe.
How to Store Dried Basil Leaves
Dried basil or any herb will need to be stored in an air-tight container. They do lose their flavor over time, but being stored in the right container in a cool dark place, such as cupboard will extend their flavor life.
Remove any stems that were dried with basil leaves, label the container with not only the name of your herb, but the date too. You may crumble leaves so they are ready for use in your favorite recipes. Or you can leave them whole to retain flavor longer. It’s up to you.
A rule of thumb for using fresh home-dried herbs is to use about ½ the amount the recipe calls for. All of these methods will still store for up to 1 year.
What method of drying basil at home will you plan on trying first?
More Storage Tips:
- 5 Ways to Freeze Fresh Basil
- 4 Ways to Dry Rosemary
- How To Make Your Own Sun-Dried Tomatoes
- 4 Easy Ways to Preserve Peppers
- Water Glassing Eggs, Preserving Fresh Eggs For Long-Term Shelf-Life

Connect with Hidden Springs Homestead!
Be sure to follow me on social media so you never miss a post!

Dianne Hadorn is the owner of Hidden Springs Homestead nestled in the hills of East Tennessee. She is a Master Gardener and enjoys helping others learn how to grow and preserve their own food and sharing tips for living a more self-sufficient lifestyle.
Hi Dianne,
My first time to dry basil. Thank you for your information, it has been very helpful. However, I do have one question when hanging the basil you say to cut the bottom of the bag I’m assuming that is so the air can flow around the basil. My question is as the basil dries doesn’t it fall to the floor?
Hi Tamera,
I apologize for the delay, I’ve been out of town. Yes, you want to cut the bottom out of the bag to give room for air circulation. When you wrap the basil stems with rubber bands, they will shrink with the stems as they dry and the basil doesn’t fall out. Go back and look at the images in the post, and wrap the stems as I’ve shown. Hope this helps.
I just harvesting a large bunch of basil yesterday and hung them to dry in three separate bunches to allow for airflow. My husband made a beautiful hanging rack for me from olive wood so I had to put it to good use! My only concern is with basil molding. Would I be able to set my oven to 150, put the basil in and turn the oven off for a short amount of time, then rehang to finish the drying process? Just to kind of jumpstart the process and reduce chances of mold?
Hi Danielle,
How humid is your house? You should be ok by just letting it hang for several weeks as long as your house is not really humid. Making the bunches smaller and having more hanging would also help with air flow. But I don’t think putting it in the oven is necessary.
Thank you for asking such a great question,
Dianne
I dried my fresh basil in the oven overnight per your directions. Came out great and so easy! Thank you for sharing.
I will be drying a large amount of basil for the first time. How many bags work well on one hanger? Based on the picture, it looks like you could fit 4 or 5, but I worry about over crowding.
Hi Michelle,
A hanger can comfortably hold at least 4. Just don’t “press” the bags together to make room. You are right, allow the basil adequate room.
This is a very well written post Dianne! I’m so glad you wrote it! Thank you!
Thank you Victoria. I’m so glad you enjoyed it.