
Hidden Springs Homestead may earn a commission for purchases made after clicking links on this page. Learn More.
These rustic pumpkin decor bowl fillers are a perfect interior fall decorating idea! They are easy to make and go well with a primitive or farmhouse style home decor.
So looking for a cute fall pumpkin craft to make? There are ideal to be used in a big wooden bowl as a fall centerpiece or even on a side table.
I love fall decorating and I’m always creating fall crafts and fall decor ideas! Who says you can’t have a pumpkin craft for adults? These are perfect!
And best of all, these DIY rustic pumpkin bowl fillers can be made for less than $1.00 each so why not make a whole big bowl full?
Actually, why not make a bunch and give them as holiday gifts to your special rustic and farmhouse lover friends too?
How to Make Rustic Pumpkin Decor Bowl Fillers
Before we begin, you will need to gather some materials. But don’t worry, if you do any type of handmade crafting or sewing at all, you more than likely already have all the supplies you need.
But if not, like I said, each pumpkin is less than $1.00 each to make. So the materials don’t cost a lot to buy.

Materials
- Cotton Muslin
- Fiber Fill
- Sewing Needle
- Nylon Thread (needs to be strong)
- Sharp Fabric Scissors (I use these)
- Antique White Apple Barrel Paint
- Foam Paint Brush
- A Stick (from outdoors)
- Glue Gun & Glue Sticks
Grunge Ingredients (For staining)
- Instant Coffee
- Vanilla Flavoring
- Nutmeg
- Water
STEP 1: Make Grunging Mixture for Primitive Pumpkin Look
In a small bowl, mix 1 cup of warm water, 6 TBS of instant coffee and stir well until coffee is dissolved. Then add 1/2 tsp of nutmeg and 1 tsp of vanilla flavoring. This will not only give your rustic pumpkin an aged look, but it will smell delicious too!
STEP 2: Begin with a Coffee Stained Cotton Muslin
Rip a piece of muslin about 10 inches wide. Most muslin comes on bolts that are either 32 inches or 48 inches wide.
I have a piece that is 48 inches, so I ripped a 10 inch wide piece the full width of 48 inches and made 10 pumpkin bowl fillers with it.
Now, “lightly dampen” the muslin under warm running water and loosely roll it up in a ball shape and completely submerge it in the coffee mixture. Allow it to sit for about 15 minutes.
Lay it out flat to dry overnight or you can place it in the oven for about 30 minutes at 175°F. Watch it closely though, you don’t want it to burn or turn black.

I’m to impatient and use the oven. A good idea if you use the oven is to lay the muslin out on a cookie sheet or solid surface. Otherwise, it does have a tendency to dry with the oven rack lines on it.
But of course, this doesn’t bother me, but it may you. So you know….
Set the coffee stain aside, we will be using this again.
STEP 3: Decide on Size of Finished Rustic Pumpkin
This easy pumpkin craft can be made in a variety of different sizes. You get to decide. I wanted mine to be used as bowl fillers so for this specific size, I used an old rusty bundt cake pan as a circle pattern.

This is a regular size bundt pan so nothing special. Of course, if you would like your pumpkins to be larger or smaller, you’ll need to choose a round object as a pattern accordingly.
Last year I made rustic pumpkins using a garbage can lid as a circle pattern and they turned out to be about 1 foot in diameter so a good size.
I needed these to be much smaller so I chose the bundt pan and they are about 3 1/2 – 4 inches in diameter. So a nice size to use as a bowl filler.
Lay your circle object down on the fabric, and using a pencil or fading ink marker, lightly trace the “circle” onto the fabric. Now use sharp scissors and cut the circle out.

STEP 4: Hand stitching Primitive Pumpkin
This is the fun part. Your handmade folk art pumpkin is beginning to come to life. Thread your needle with a “strong” nylon sewing thread about 10-12 inches long. Don’t use a cotton thread as this will break too easily.
You’ll also need it long enough to grab hold and “pull super tight” so make sure it longer than normal.

Using a simple straight stitch, sew around the edge about 1/8 inch or so from the edge. Hand stitch all the way around back to where you started. Give the thread a good pull to cause the edges to gather together.
STEP 5: Filling or Stuffing Fall Pumpkin
Grab a great big hand full of polyfil and role it into a semi-tight ball. Carefully, begin to stuff it inside the gathered coffee stained muslin fabric. You’ll need to tuck it in, then pull the thread to tighten, tuck some more and pull.
Do this until you have gotten all the polyfil nicely tucked inside the coffee stained muslin fabric. Pull the thread super tight to leave only a small hole in the center.
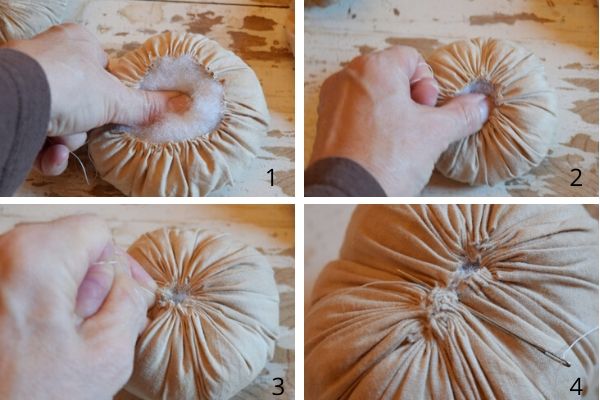
Now, while holding the thread tight so it doesn’t allow poly out, make 3-4 stitches in the top to hold the fabric closed. Once tight and holding, trim off thread.
STEP 6: Painting Pumpkin Bowl Filler
This step is optional…… I like a really old and worn grungy look so I do this.
Using the antique white paint and foam paint brush, lightly brush paint onto fabric being sure to “get inside the gathers” around the top. Cover most of the pumpkin, but do leave a bit of fabric that is not painted. This will help to increase the grunge look.

Allow to dry for an hour or so.
STEP 7: Grunging Pumpkins for A Rustic Look
Once the paint as dried well, now, using a foam paint brush, brush the whole pumpkin with the coffee stain.
Again, you can place these into the oven and dry them quickly as you did before, or you can leave them sitting out overnight to dry well.
I’ve been known to do both. I should tell you, by putting them in the oven and drying them, this will make them a more of a darker-black color, not necessarily brown, so you need to decide. If you choose not to use the oven this time, as I said, just leave them sitting overnight.
STEP 8: Adding the Stem
Remember that stick you picked up outside? Now using a pencil poke it into the top of the fabric pumpkin in the tiny hole you left.
Next, cut the stick to the length you would like for a pumpkin stem and then add a bit hot glue to one end and carefully stick inside the fabric pumpkin and give it a little twist.
This smears the glue onto the polyfil and holds in place well.

And there you have it! You’ve made your very own fall rustic pumpkin decor craft! These are so stinking cute and will look wonderful in a big wooden bowl on a side table or even sitting on a shelf.
Since you are now in fall decorating mood, take a look at these 13 awesome ways to decorate your front porch for fall.
More Primitive Decor Ideas
- 13 Front Porch Decorating Ideas
- Primitive Pumpkins on a Stick
- Primitive Christmas Tree Tutorial
- 19 DIY Fall Wreaths for Your Front Door
- DIY Wooden Block Pumpkins
Rustic Pumpkin Decor - Bowl Fillers
These cute rustic pumpkins are perfect for fall decorating! They fit well into a country or farmhouse style decor.
Materials
- Grunge Stain:
- 3 TBS Instant Coffee
- 1 tsp Vanilla Flavoring
- 1/2 tsp Nutmeg
- 1 cup Water
- Pumpkin Materials:
- Cotton Muslin (scrap)
- Fiber Fill
- Sewing Needle
- Nylon Thread (strong)
- White Paint (Folk Art)
- Foam Paint Brush
- Small Stick from outdoors
Tools
- Fabric Scissors
- Glue Gun and Glue Sticks
Instructions
- Mix 1 cup of warm water, 6 TBS instant coffee - stir well. Then add 1 tsp vanilla flavoring & 1/2 tsp nutmeg. Mix and set aside.
- For a 3-4 in diameter pumpkin, rip a 10 inch piece of muslin the width of the bolt. This will make about 6-7, depending on the size. Lightly dampen muslin fabric and then submerge into coffee mixture. Let sit for 15 minutes. Remove, lay flat to dry over night or dry in the oven for 30 min at 175°.
- Decide on object you will use as a "circle" pattern. I used a bundt pan. Lay it on stained muslin and trace with a pencil. With fabric scissors, cut out circle pattern.
- Thread needle with 12-14 inch long piece of nylon thread. Straight stitch about 1/8 inch from the edge around pumpkin until meet back to where you started. Give the thread a good pull to "gather" muslin fabric into a circle shape.
- Grab a good size amount of fiber fill and stuff this inside the pumpkin, pulling , tucking, pulling, tucking until fiber is secured inside. Now put 3-4 stitches through to hold closed. Trim thread.
- THIS STEP IS OPTIONAL: To add extra grunge - using foam brush and antique white paint, and brush pumpkin to cover "most" but not all. Leave some unpainted.
- Once paint has dried well, using a foam brush, pain coffee mixture over entire surface of the pumpkin. Then let dry over night, or dry in the oven again.
- Cut a piece of the stick from outdoors about 3 inches long, add hot glue to one end and stick down inside pumpkin where it's gathered together. And give it a twist.
Notes
Time does not include drying time. Only active work time.

Connect with Hidden Springs Homestead!
Be sure to follow me on social media so you never miss a post!

Dianne Hadorn is the owner of Hidden Springs Homestead, nestled in the hills of East Tennessee. A Master Gardener and lifelong homesteader, she teaches families how to grow real food, preserve it with confidence, and depend less on the grocery store. Through her practical, down-to-earth approach, Dianne has become a trusted source for beginners who want to build a sustainable lifestyle and fill their pantries with food they’ve grown themselves.
Plan to make a batch of these. Thanks so much. Cute idea for tier trays, etc.
Thank You, these will be perfect for my dough bowl! Just love them!!