
Hidden Springs Homestead may earn a commission for purchases made after clicking links on this page. Learn More.
Raising baby chicks is a lot of fun! If you are a beginner it can seem a bit overwhelming or even stressful.
Not because its hard, but since there is so much information floating around, exactly what are you supposed to do, how do you care for them and what supplies do you truly need to provide?
When I started reading about raising baby chicks at home, I will admit that I was somewhat intimidated.
It seemed that all the articles of baby chick care information I read seemed to assume I knew all the terms that were tossed around were, but I didn’t.
Raising chicks is not difficult and you don’t have to have an elaborate setup. It just needs to be fun, safe and enjoyable. But they are babies and they do come with responsibilities and you will need to provide some supplies. So just what is needed?
Raising Baby Chicks A Beginners Guide
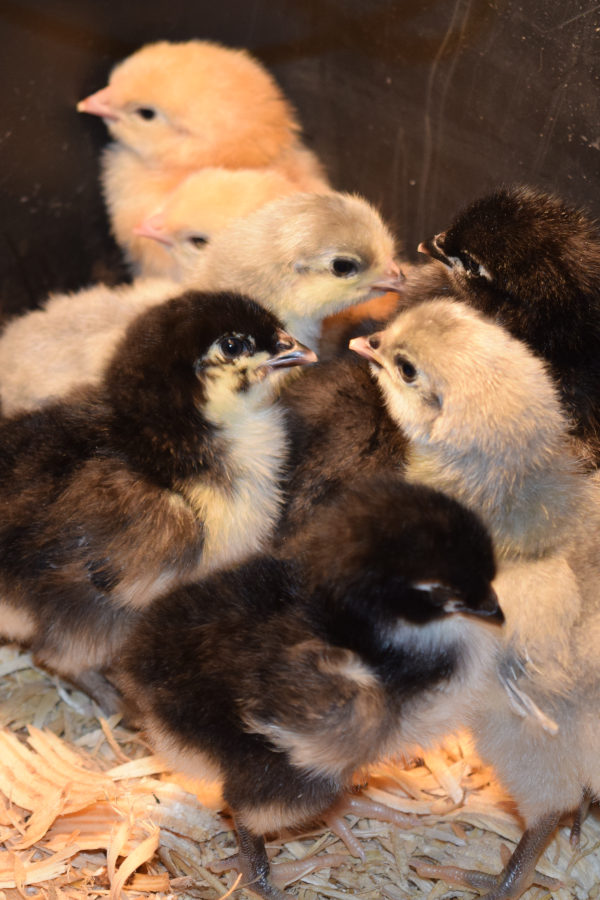
These cute little balls of fluff are super adorable. They are entertaining to watch and you’ll find yourself sitting forever it seems just watching them. Or at least I did.
They all seem to be finding their own little personalities and everything is new. Their food, water, pine shavings, the heat light, it’s a whole new world for them. It is a bit sad since they don’t get to have mama hen to cuddle them and keep them warm, so this make it your most important responsibility.
How to Care for Chicks at Home
As I mentioned, caring for baby chicks is not hard, it is just needs to be done right and all their needs met, otherwise they will likely not survive. It takes some preparing for them arrive. And you need to all of it done BEFORE they arrive.
What is a Brooding Area?
A brooding area is simply a protected room or building the chicks will be living in for the first 6 weeks of life until they grow large enough to be put into a chicken coop full time.
Before you bring home baby chicks, you will need to have this area set up. I’ll be honest, when I first started reading about raising chicks, this term through me for a loop. A brooder? A brooding area- what the heck is that?
Your brooding room should be warm and draft free. They need to be protected and safe from animals, even house pets.
Get a lot more specific details by going to Setting Up A Brooder Box for Baby Chicks.
What is a Chick Brooder?
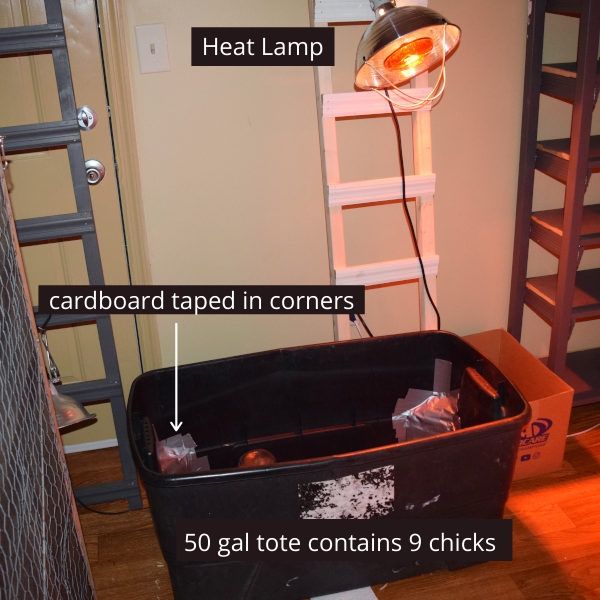
A chick brooder is just a box. A heated box or container that is at least 18 inches deep and has enough space for the chicks move around as well as space for their food and water. A simple plastic box, plastic totes, a water trough or other secure container will work. It will need to be lined with pined shavings.
I brought home 9 baby chicks and I’m keeping them, for now, in a 50 gallon Rubbermaid tote inside my under construction canning room.
I would not recommend a cardboard box since they do get messy, poop and spill water. The cardboard would absorb moisture this can cause problems and even disease.
The corners also need to be wide. These little guys cuddle closely together and one could be smothered if it gets pressed into a sharp corner. I tapped cardboard in the corners of the tote to make them wider angles.
You can buy brooder boxes in farm stores or online, but this is totally up to you. Store bought brooders will be round or oval shapes without corners.
Line the bottom of the chick brooder with 3-4 inches of pine shavings. Use large pine shavings or pine pellets. Do NOT use cedar. This will interfere with their respiratory system and cause issues. You will add a couple inches of shavings a day just to keep the brooder clean.
Do Baby Chicks Need Heat Lamps?
Yes! Most definitely! The very first thing to do before you put chicks in the brooder is have a heat lamp set up and the brooder at 95° about 2 inches off the pine shavings. If mama hen was with them, her normal body temperature is between 105°-107°F, so she would be keeping them really toasty.
You’ll need to have a heat lamp attached safely above the brooder before you put them in it. Their little down-feathered bodies need to be kept warm or they can suffer with hypothermia relatively easily and die.
Make sure to use a red brooder lamp, not an incandescent bulb. The red will help the babies to be more relaxed and sleep better. It will also help to reduce pecking.
I made this mistake the first 3 days, my chicks didn’t seem to sleep and were a bit agitated. I changed to a red bulb and problem solved. It made a major difference in their behavior.
My red light is 250 watts and to keep it a comfortable 93°-96°F I had to move it a couple times a day to keep the temperature consistent. The brooder lamp did have spring loaded grips, but for safety, I tied it with wire to a canning shelf end leaned against the wall behind the brooder box. (see image above)
At night, when it got a bit cooler outside, I had to move it closer and then when the sun was shinning and the house was warmer, I moved it further away.
Week by Week Temperature Chart Needed Raising Chicks
How warm do do baby chick need to be and how long do they need a heat lamp? As they grow, the temperature needed to keep them warm and healthy reduces. Here’s a baby chick temperature chart you can use.
Use the tips column to know when to remove your lamp. This will give you an idea of how long chicks need to be kept inside.
| WEEK | CHICK AGE | TEMPERATURE | TIPS / Considerations |
| WEEK 1 | 0-7 Days | 95°-100°F (35°C) | Don’t allow out of brooder |
| WEEK 2 | 7-14 Days | 90°-95°F (32°C) | Babies begin flying, cover brooder with a lid |
| WEEK 3 | 14-21 Days | 85°-90°F (29.5°C) | Begin taking outside if temps are equal “for short periods” |
| WEEK 4 | 21-28 Days | 80°-85°F (26.6°C) | Take chicks out more often – be sure to protect |
| WEEK 5 | 28-35 Days | 75°-80°F (24°C) | Turn off heat lamp if brooder area is equal in temp |
| WEEK 6 | 35-42 Days | Can stand to 30°F – Below | Ready for full time in chicken coop |
What Supplies Do You need To Care For Chicks?
Brooder Thermometer
You will need to keep a thermometer inside the brooder at all times to keep a very close eye on the temperature. If it’s too cold, move the light closer and too warm, it will need to be further away.
I really like this thermometer because the numbers are large and easy to read standing near the brooder, making it much easier to keep an eye on the chicks. Of course, they enjoy standing on it as well.
You will need to plan on checking the chicks several times a day to keep a close eye on the temperature. Keep it a constant as possible.
The heat lamp will need to stay on the chicks until they are at least 6 weeks old or the room temperature is the same as the brooder temperature above. As they grow and feathers you will be reducing temperatures – 5°F each week.
Feeders and Waterers
As soon as you bring these little puff balls home, they will immediately need access to food and water. Depending on how old they are – chicks can do without food and water for 24-48 hours after hatching. But you will still need to show them the food and water so they know it is there.
First, introduce them to water before you put their food inside the brooder. To introduce them, carefully hold them in your hand and using finger, gently dip their chick beak into the waterer by pushing the head down. They may even take a drink. And then simply sit them down next to the waterer. They now know where to find it.
By the way, I use this chick water, it’s affordable and I have lots of Mason jars.
If you have more than one chick, and I’m sure you do, introduce each one to the water – one at a time.
You’ll need to change their water daily if not more than one time a day. My babies, kept flipping shavings in it and since we have well water, the heat in the brooder made it a bit stale smelling. So I was changing it 2-3 times a day.
Each time I changed it, they come running to the fresh cool drink. So I know they appreciated it. And it was so cute!

Next, after they have been introduced to the water, place a piece of cardboard inside brooder on top the shavings and set the feeder on it. Now, sprinkle a bit of chick feed around the feeder on the cardboard.
You may need to do this a couple of days. So they find their way to the chick starter inside the feeder, I use this one. Once they figure this out, you’ll just need to keep the feeder filled with chick feed.
What To Feed Chicks?
Chickens come in basically 3 types. Laying hens, which I have, meat chickens and then one that is a combination. But what do you feed baby chicks immediately after hatching?
As I mentioned already, chicks can safely go for 24-48 hours after hatching without being fed. They have fed off the yoke of the egg and can safely sustain this time. This is why hatcheries are able to ship newly day old chicks across the country.
Laying hen chicks will need to be fed a good and nutritious chick feed starter that is at least a 18% non-GMO organic chick feed, I feed this one. This food is designed to nutritionally provide all the nutrients these cute little babies need to grow strong and healthy.
For meat chickens, you’ll need to feed a higher protein of 22-28%. I’ve not raised meat chickens and don’t know a lot about raising them, but I trust this article from Mother Earth News will be a good starting place to learn about it.
So as you can see, caring for and raising baby chicks is not as hard as it may sound. I know when I brought my first ones home, I’ll admit I was nervous. But after actually doing things and having the actual birds, I will say it has been a lot less stressful than expected.
More Homesteading Posts You’ll Be Interested In:
- Setting Up a Brooder Box For Chicks
- How to Create an Emergency Stockpile
- 13 Best Backyard Chicken Breeds for Beginners and Why
- When Can Chicks Go Outside to the Coop? Best Guide for Beginners
- 28 Realistic Ways to Make Money Homesteading
- How to Plan and Set Goals For Homesteading
- Best Books About Homesteading for Modern Homesteaders
- When Should Chicks Switch to Layer Feed?
Pin for later:

Connect with Hidden Springs Homestead!
Be sure to follow me on social media so you never miss a post!

Dianne Hadorn is the owner of Hidden Springs Homestead, nestled in the hills of East Tennessee. A Master Gardener and lifelong homesteader, she teaches families how to grow real food, preserve it with confidence, and depend less on the grocery store. Through her practical, down-to-earth approach, Dianne has become a trusted source for beginners who want to build a sustainable lifestyle and fill their pantries with food they’ve grown themselves.