
Hidden Springs Homestead may earn a commission for purchases made after clicking links on this page. Learn More.
Learn how to make this delicious homemade apple cider vinegar recipe! Some call it apple scrap vinegar but, most importantly, it’s made from scratch for pennies.
You’ll learn not only how to make it at home but some benefits of apple cider vinegar and just how versatile it is too. Not to mention it’s basically free, so you save money on the family budget.
I don’t know about you, but vinegar is a staple on our homestead. We use it for everything from cooking to cleaning and even on our livestock. So let me tell you, when I find a way to stock our pantry shelves with something FREE that’s so helpful- I’m in!
Since fall is when fresh apples are ready for harvest, it’s the perfect time to make this apple scrap vinegar.
So first things first, don’t throw out those apple scraps! When canning homemade applesauce or apple pie filling, save the peels and cores. Or maybe you are baking several dozen of delicious gluten-free apple muffins from scratch to freeze for breakfast or quick healthy snacks – save the scraps!
RELATED: Apple Butter Recipe for Canning
Uses For Apple Cider Vinegar (From Scraps)
RELATED: Want to learn how to preserve food like a pro? This Ultimate Guide to Food Preservation Methods covers everything from freezing and canning to dehydrating, fermenting, and storing food for long-term freshness.
Household Uses
- Clean streaks on windows – Use a 1:3 part mixture of apple scrap vinegar and water
- Spot Cleaning – Wipe down or clean spots on painted walls
- Carpet stains – pour on a small amount of apple scrap vinegar, sprinkle with salt, scrub, and vacuum
- Kill Mildew – Depending on the severity, spray vinegar solution directly on it and scrub
- Unclog drains – pour in 1/2 cup of regular baking soda into the drain, and then follow with 1 cup of apple cider vinegar. You will hear the “sizzle” of the mixture, and it helps to break up the clog
- Use as a floor cleaner – mix 1:1 part apple cider vinegar and water, and clean. Of course, if you prefer not to use an ACV mixture, you can use this homemade citrus cleaner instead.
- Clean and scour stovetops, countertops, and the microwave. Mix a 1:1 solution with apple scrap vinegar and water. Spray on the surface and wipe clean.
- Remove stains on dishes. Coffee stains on cups easily wash away.
- Deodorize the dishwasher. Put 1 cup of homemade apple scrap vinegar in a bowl and set it on the top rack. Run cycle. The dishwasher can still have dirty dishes – it will still deodorize.
- Deodorize the washer as well. Add 1 cup where you would normally put detergent and run the cycle. Your washer will smell fresh again.
Personal Uses
- A great ingredient for making skincare products
- Make apple cider vinegar and add it to homemade hair shampoo.
- Or Kathi at Oak Hill Homestead explains how to use homemade apple cider vinegar as a hair rinse with her shampoo bar.
Benefits of Apple Cider Vinegar
Apple vinegar also has several health benefits. For centuries people have used it for perceived health issues. Many swear by it.
I’m not sure I swear by it, but I do enjoy drinking it hot mixed with raw honey and lemon. It’s a wintertime drink I enjoy just about every night. I love the flavor, and it’s a healthy hot drink.
But, some studies suggest it aids with inflammation, allergies, and even weight loss. Read more about those benefits here.
I also use apple cider vinegar for aiding to prevent health issues with my chickens. Nature’s Best Organic Feed has this really quick read on the benefits of ACV for chickens.
Should Homemade Apple Cider Vinegar be Refrigerated?
After the cider has gone through the fermentation process and is to your liking, as far as taste, it doesn’t need refrigeration.
Here’s why (simple science lesson): Beginning with fresh apples and added to sugar water left to sit in a dark place for about 2 weeks becomes alcohol; then, if left to remain fermenting for 4-8 weeks, the alcohol becomes an acidic acid (known as vinegar). Acidic acids are shelf-stable.
General Need to Knows for Making Apple cider Vinegar from Apple Peels and Cores (Apple Scrap cider)
- Never use metal or plastic. Always use glass jugs anytime you are fermenting.
- Clean all utensils and containers well before using – make sure to rinse off soap residue
- Never use chlorinated water – use spring water, distilled or filtered
- Sugar speeds the process of fermentation, so don’t skip it
Homemade Apple Cider Vinegar Recipe
Using only 3 ingredients, this homemade apple cider vinegar is easy to make.
Supplies:
- Large glass container ( I use half-gallon canning jars)
- Rubber band
- Cloth to cover jar – (i.e., coffee filter, muslin scrap, etc.)
- fermentation weights (optional)
- Fine Mesh Strainer
Ingredients:
- Fresh apple peels and cores or slices
- Organic cane sugar
- Spring water or non-chlorinated water
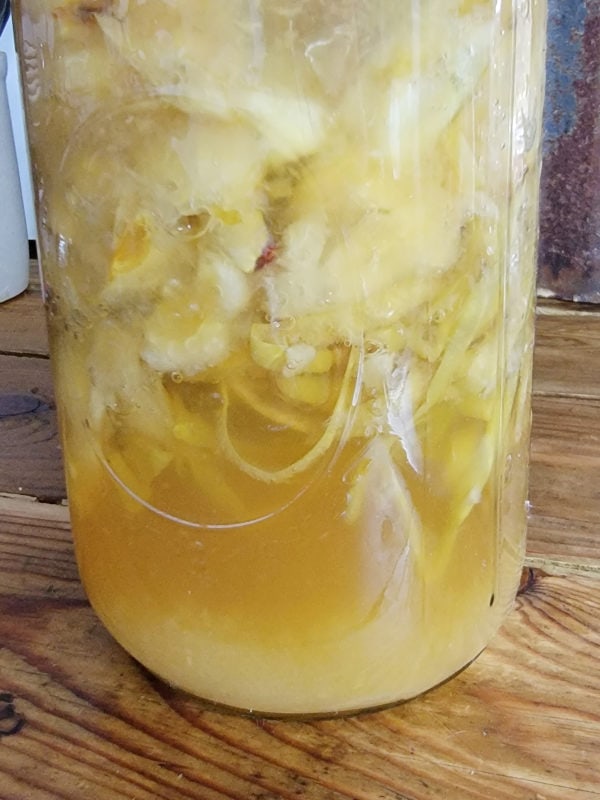
Fill the glass jar to 3/4 of the way full with apple scraps.
Mix sugar with water and stir until dissolved. Pour over apple scraps, leaving 2 inches of headspace for fruits and bubbles to expand while fermenting.
Place a fermentation weight on top of the apples to keep them submerged, or use a sealable Ziploc sandwich bag half-filled with water. Place the bag on top; the weight will keep the apples covered with the sugar water.

With a cloth, cover the jar to keep fruit flies out and secure it with a large rubber band. Set in a cool dark area out of direct sunlight for 2 weeks.
Stir it every few days. You will notice bubbles beginning to form inside; this is the fermentation process taking place. Cover it back over with a cloth and secure it with the rubber band.
NOTE: You will have fruit flies. I have no idea where they come from, but they will appear.

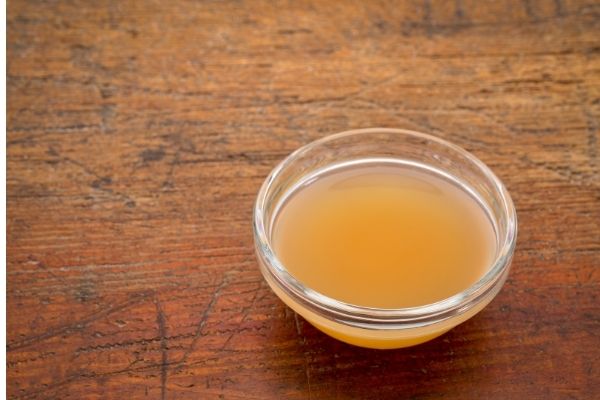
After 2 weeks have passed, with a fine-mesh strainer, strain liquid off fruits. Vinegar should have a pleasant sweet apple cider flavor but lacks that vinegar tang.

Next, clean the jar and pour the liquid back into it. Cover it with a cloth and secure it with a rubber band. Place it back into the cool dark area for another 4-6 weeks. Or until it has the tangy vinegar flavor you prefer.
Compost leftover fruit pieces or put them in the trash, or better yet, feed them to the chickens – they will love it.
What is the Slime Thing Floating in My Homemade Apple Cider Vinegar?
It’s called a “mother” in vinegar. It’s a slimy film-like gelatinous disc that floats like a “sliver of a liver” that forms during fermentation.
The film is a combination of cellulose and acetic acid bacteria made when alcohol is exposed to oxygen and turns into vinegar.
It is healthy and safe to leave in your vinegar recipe. It can be eaten if you are brave enough or saved as a starter for another batch of apple cider vinegar.
How to Tell When Raw Apple Cider Vinegar is Ready
- It will smell like delicious vinegar, and it tastes like tart vinegar. You can sip the flavor every week or so until it tastes the way you like it
- The color will change to a deeper, more caramel color
- The smell will be a distinct vinegary smell and no longer smell like alcohol
Store it just like you would any other vinegar. Remove the cloth and put on an airtight lid. Keep it in the pantry and use it as you would a store-bought raw apple cider vinegar.
Homemade Apple Cider Vinegar FAQ’s
How much does it cost to make homemade apple cider vinegar?
It’s essentially free. If you use apple scraps, the only investment is sugar. My recipe uses 1 tablespoon of sugar per 1 cup of water. The cost of sugar comes out to about 1/2¢ per tablespoon, and one-half gallon has 8 cups of water. (8 x .005= 0.04) So making apple cider vinegar at home will cost approximately .04¢ to make a half gallon.
So it’s much more budget-friendly than storebought. Well-known brands cost, on average, $5.76 for a 32 oz. bottle. So it makes sense to make your own raw vinegar, and you can feel safe using it.
How long does it take to make homemade apple cider vinegar?
Approximately 4-6 weeks from start to finish. This time varies depending on your personal preference. Mine normally takes 2 weeks to ferment scraps and then 3-4 weeks to allow alcohol to convert to acetic acid.
Can homemade apple cider go bad?
Apple cider vinegar is acetic acid – it does not go bad. Acetic acids are self-preserving and will keep safely on the pantry shelf. The best way to store it is in an airtight glass jar in a cool dark place.
Can honey be substituted for sugar when making DIY apple cider vinegar?
Yes, honey can be substituted, but the fermentation process will be slower. The beneficial microbes need sugar to eat, and using real sugar will make the process quicker. The sugar is not used for flavoring; it is used to feed the microbes to move the process from alcohol to acetic acid (vinegar).
Can you use bruised and/or brown apples to make apple cider vinegar?
Yes! It is perfectly safe to use not-so-perfect apples. It’s a much better use of them rather than tossing them into the compost. But avoid using rotten or moldy ones. Do compost these.
More Food Preservation Recipes:
Homemade Apple Cider Vinegar - from Scraps

Don't toss those apple scraps! You can ferment them and turn them into homemade apple scrap vinegar to use for cooking and DIY household cleaners.
Ingredients
- Fresh Apple Peels and Cores
- 1/2 gallon of non-chlorinated water
- 8 tablespoons organic sugar
SUPPLIES
- 1/2 Gallon Glass Jar
- Fermentation Weights (optional)
- Fabric to Cover Jar
- Large Rubber Band
- Fine Mesh Strainer
Instructions
- Fill the glass jar to 3/4 full with apple scraps.
- Mix sugar and water, and stir until dissolved. Pour over apples until fully covered. Leaving 2 inches of headspace.
- Cover loosely with a cloth or coffee filter, secure with a rubber band, and place in a cool dark area out of sunlight for 2 weeks.
- Stir every few days, and you will begin to notice bubbles - this is a good thing.
- After 2 weeks, strain the fruit from the liquid. Put the liquid back into a clean glass jar, cover it with a clean cloth, and allow it to sit in the cool dark area for another 4-6 weeks. Taste it from time to time to see when it has the tangy flavor of vinegar you like.
- Once done, cover with an airtight lid and store back in a cool dark area.
Notes
Leftover apple scraps can be composted or given to the chickens.
You will have fruit flies during fermentation, so keep apple scraps covered at all times.
Pin this for later:

Connect with Hidden Springs Homestead!
Be sure to follow me on social media so you never miss a post!

Dianne Hadorn is the owner of Hidden Springs Homestead, nestled in the hills of East Tennessee. A Master Gardener and lifelong homesteader, she teaches families how to grow real food, preserve it with confidence, and depend less on the grocery store. Through her practical, down-to-earth approach, Dianne has become a trusted source for beginners who want to build a sustainable lifestyle and fill their pantries with food they’ve grown themselves.
Thank you for all the information on making apple cider vinegar from scraps. I did notice the recipe said fresh Apple scraps. But I was still wondering if it’s possible to use the Apple scraps left in the food mill after you’ve made applesauce. The scraps have been cooked. An answer to this question would be very much appreciated.
Hi Carol,
Though homemade vinegar is made from the juices of the apples, it also needs the yeast and sugars in the fruit for the fermenting process. If your scraps have been cooked, the yeast has been killed and the sugars cooked out. By fresh apples, I mean when you peel them with a peeler and they have not been cooked.