
Hidden Springs Homestead may earn a commission for purchases made after clicking links on this page. Learn More.
Learning how to make your own stencils is by far much cheaper than buying them online or in the store.
Best of all, it’s fun and anyone can do it! It does take a bit of patients, but if you’re a fellow DIYer, like me, then you will enjoy the challenge.
Stencils don’t have to cost a lot of money, in fact it can cost only pennies. You will need only a few simple supplies on hand.
The great thing is the supplies are nothing out of the ordinary and can be used for so many projects and not just a stencil.
But of course, if you don’t prefer a DIY stencil, a great machine for making stencils is the Cameo Silhouette 4. Just make the design, press a few buttons and your stencil cuts.
My friend has one, and these are really nice. Maybe I should add this to my wish list.
How to Make Your Own Stencils?
If you struggle with the actual artwork, a good site to get ideas and free designs from is Spray Paint Stencils.

Stenciling is such a creative and easy way to transform a room or piece of furniture and it doesn’t have to break the bank. You can take something that is really ugly or plain and make it gorgeous! So let’s get busy talking about how to make your own stencils so you can get into the best part – the painting!
Supplies Needed to Make Your Own Stencils
- pattern or design of your choice
- Transparency / Mylar Sheets
- Xacto Knife
- Painters Tape
- Sharpie Marker
- A cutting mat or thick cardboard surface for cutting your pattern on

Instructions
1). First thing you need to do is to find the pattern or graphic you wish to create. The picture below is of the floor in our spare bedroom using a couple different stencils I created. This to give you an idea what you can do, the possibilities are limitless. I’ll share with you at another, a tutorial on how I did this floor. Not hard at all.
Are you a decorating dreamer, I am? I do love pretty things but I don’t enjoy the price tag that come with them. I very much love the Old Colonial Farmhouses that have the gorgeous hand-painted walls and floors but goodness knows, I am not an artist. I’m also super frugal person so purchasing overly priced stencils or hiring an artist to do it for me is not option. So I created my own, and I’m pleased with the way it turned out.

You can search online for ideas such as google “repeating patterns” and look at images or you may have a picture of something from a magazine that you simply love. If you have a photo editing software you can save it, download it into the software for formatting/editing. If not, and you are like me, I took my small image to a big box office store and had it printed to the size I needed in black and white.
I had already decided on the size of the finished design, so I knew what size the stencil needed to be. The cost for them to print my “black and white” copy was whopping $1.25. Huge savings!!
2). Next is to make sure your transparent/mylar sheet is large enough to completely cover your pattern. You don’t want to be cutting your design out only to discover it’s too large for your image. Just place them together to make sure the entire stencil image will fit on your mylar.
3). On your cutting surface, use painters tape (it’s forgiving when removing) and tape the mylar sheet down with the “cutting side” up. (Your package will tell you what side is the cutting side). My cutting surface is on my kitchen counter top which is a piece of “scrap granite” I got for FREE from a local cabinet shop that installs counter tops on their cabinets. If you have a such shop in your area, check with them you never know. They regularly toss out great sizes they cannot use, but will work well for a crafting or cutting surface.
4). Next, lay your image on top of the mylar sheet and tape it to the cutting surface as well. Make sure that both are secured well to the cutting surface so neither can move. You will have several pieces of tape attached to your cutting surface and that’s great!

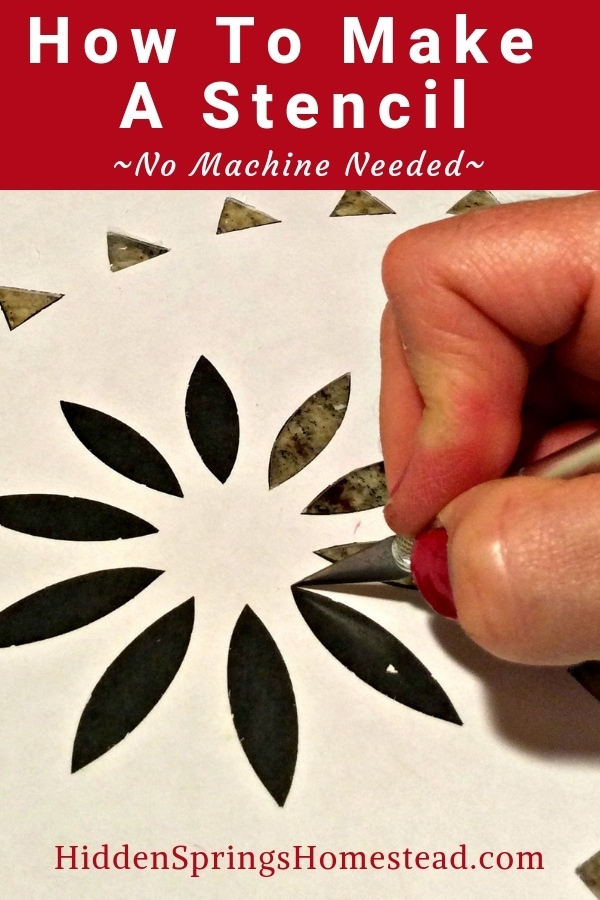
5). With the Xacto knife, and a NEW blade, begin cutting along the image design lines. (Note, if the size was enlarged much, the edge lines will be a bit blurry – this is not a problem – you can trace the edges with the sharpie marker to make clearer if you wish). The blade will cut smoothly through the mylar sheet.
6). Continue to cut until you have completed the entire stencil. Removing all pieces as you cut them. This will make sure you have cut the entire stencil before you remove the tape.

7). Once the stencil is cut, carefully remove the tape pieces and lift your pattern off the mylar sheet. Next carefully remove the tape from your actual stencil. It’s ready to use.
Storing Your Stencils
In the hopes of extending the life of my stencils after I’m done with them, I store them lying flat in a flat surface tote something like this one. It does take up a lot of space, but I tried keeping them in a upright file, and I didn’t like the way they would bend, so I choose to keep all my stencils lying flat in this. I have lots of stencils I have made an they are all kept in one place and easy to find when I’m making a new project.
Clearly I love stencils. I hope you have been inspired to try making your own or you may have another way of making them you would like to share.
What have you stenciled in your home or what do you dream of stenciling? I would love to hear from you in the comment area below. If you have images of things you have stenciled, feel free to share.
Don’t forget to Pin for Later
Connect with Hidden Springs Homestead!
Be sure to follow me on social media so you never miss a post!

Dianne Hadorn is the owner of Hidden Springs Homestead, nestled in the hills of East Tennessee. A Master Gardener and lifelong homesteader, she teaches families how to grow real food, preserve it with confidence, and depend less on the grocery store. Through her practical, down-to-earth approach, Dianne has become a trusted source for beginners who want to build a sustainable lifestyle and fill their pantries with food they’ve grown themselves.
I would love to try to make a stencil like you used on your border. Is it possible to have you to send picture and then I could take it and have made the size I need?
Thanks for your help.
Hi Terry,
I’m not sure which picture you are asking for. Can you tell me which one and I’ll do my best to help. Those images are several years old, so I may not find it quickly, but the pattern is an old colonial if you do an internet search of colonial quilt designs, you might get lucky and find it. Let me know which way I can help.
Your floor looks fantastic! Such a pretty pattern. Thanks for the helpful tips.
I would like to see more detailed pictures for us newbies!
Thanks!
Hi Kathleen,
Can you tell me more specifically what images you need to see? I have a few that are unedited but would be glad to put them into a zip drive and email them to you. But they are pretty much what is in the post. Do you care to be more specific on what you need? I’ll work with you happily.
I am trying to make a stencil to put on my kitchen backsplash. I got a new Xacto, and a package of Plaid Folk Art stencil sheets. There were no instructions on which side to cut on or how thick the sheets were. ( I thought that they were very thick) It was so hard to cut through, I had to make multiple attempts, which made jagged edges. I had to press so hard, it really hurt my fingers.
What am I doing wrong? Any suggestions welcome.
Hi Patti,
This is a great question. I’ve never used the “Plaid” brand before, but I find it easier to cut on the “dull” side. The material is very thick, you are right and it takes a bit of time to cut out a pattern. If Plaid is like other brands, the “shiny” side is actually a film that is removed after the pattern is cut out. I find that it is sort of tedious to cut through the film, since it is so thin, so I go ahead had remove it before cutting. It does make it easier.
For a smooth cut with your new Xacto, you need a very smooth hard surface. And then press the tip into the sheet and lower to an angle to cut smoothly. The tip will penetrate the surface easier and then it will “cut” through. Hold the knife at an angle for the entire cut.
I tape the sheets to my counter tops. I tried it on a wood surface and it didn’t work (too soft)- it was hard to get smooth cuts. My counter tops are some sort of stone scraps I got out of our landfield. The cabinet shop was throwing them out when I was there and they allowed me to grab 3 pieces off their truck. My kitchen is tiny, so scraps works great and they were free. But you do need to work on a hard smooth surface. My friend cuts hers on an old ceramic tile floor. A thick piece of smooth glass, like a glass table top works well too. Take your time making the cuts and rest your fingers often. You are doing nothing wrong. It’s just a bit of sweat equity in getting that awesome stencil customized in your own design. I’d love to see it when you done. Hope this helps, if you have more questions, reach back out.
Happy DIYing,
Dianne
Hi! I’m wondering what type of mylar you use and where you purchase it from? Thank you so much for sharing! Your floor is beautiful!
Hi Najla,
I always use this 12×17 inch Mylar. This is the one I used in this project. I have ordered other sizes as well, but really like this size for my projects. It’s a good thickness to hold up while using over and over to paint, but not impossible to hand cut with the xacto knife.
I’d love to see what you make.
Dianne
Very informative! Floor looks greatly. You done a wonderful job!!!
Thank you for the compliment Alisha.